Friday, December 25, 2020

WE LIVE WITH TREES


 The wind bellowed down our hill the night before last, shaking our house and waking me up. At 3:30 I got up to close the window that had been creaking back and forth in the wind. At four o'clock, I heard a boom outside and knew something big in our yard had come crashing down. We've lost trees to storms in previous years. I thought of the three trunk stumps in the back. Instead of taking the trees down completely, we had someone carve bears in the stumps left behind.


The tree broke the top bear in the stump into two pieces


We planted redwood trees years ago on the hill at the back of our house. Like twigs at first, they now tower 4 or 5 stories above us. Their trunks have expanded so that the circumference of the biggest one is 21 feet around. They appear to be strong, sturdy, and indestructible. Their roots fill the hill so that it is hard to plant anything beneath them. But they are vulnerable. The one closest to the bottom of the hill has been struck by lightning a long time ago. The trunk split into two trunks and continued to grow skyward. Closer to the top, the bigger trunk again was damaged, split, and now has four trunks pushing towards the sky.

The lesser of the two original trunks broke from the tree and crashed down in the wind. We were lucky because it came down parallel to our house. The wound left on the tree runs down the side for four or five feet, glaringly creamy white in the sun. The telephone pole-like remains on the ground reached almost to the other side of the yard forty feet or more, the size of a small tree, heavy enough to smash everything underneath.


The fallen tree pulverized one bear stump, the bears dissolving into crumbled wood, and cut another stump in two. The Pride of Madeira bush that had been thriving and the Carpet roses near the stump disappeared under heavy branches. The pear tree looked like it had a bad pruning job. The wisteria lost its crown. When we walked into the yard, we were stunned. We knew that this tree was weakened, but the task of removing it had always seemed monumental with either someone climbing up the trunks or a crane precariously reaching for the top. So we left it, hoping that the trunks would withstand the wind.


The broken top half of one tree stump


The remaining bottom half


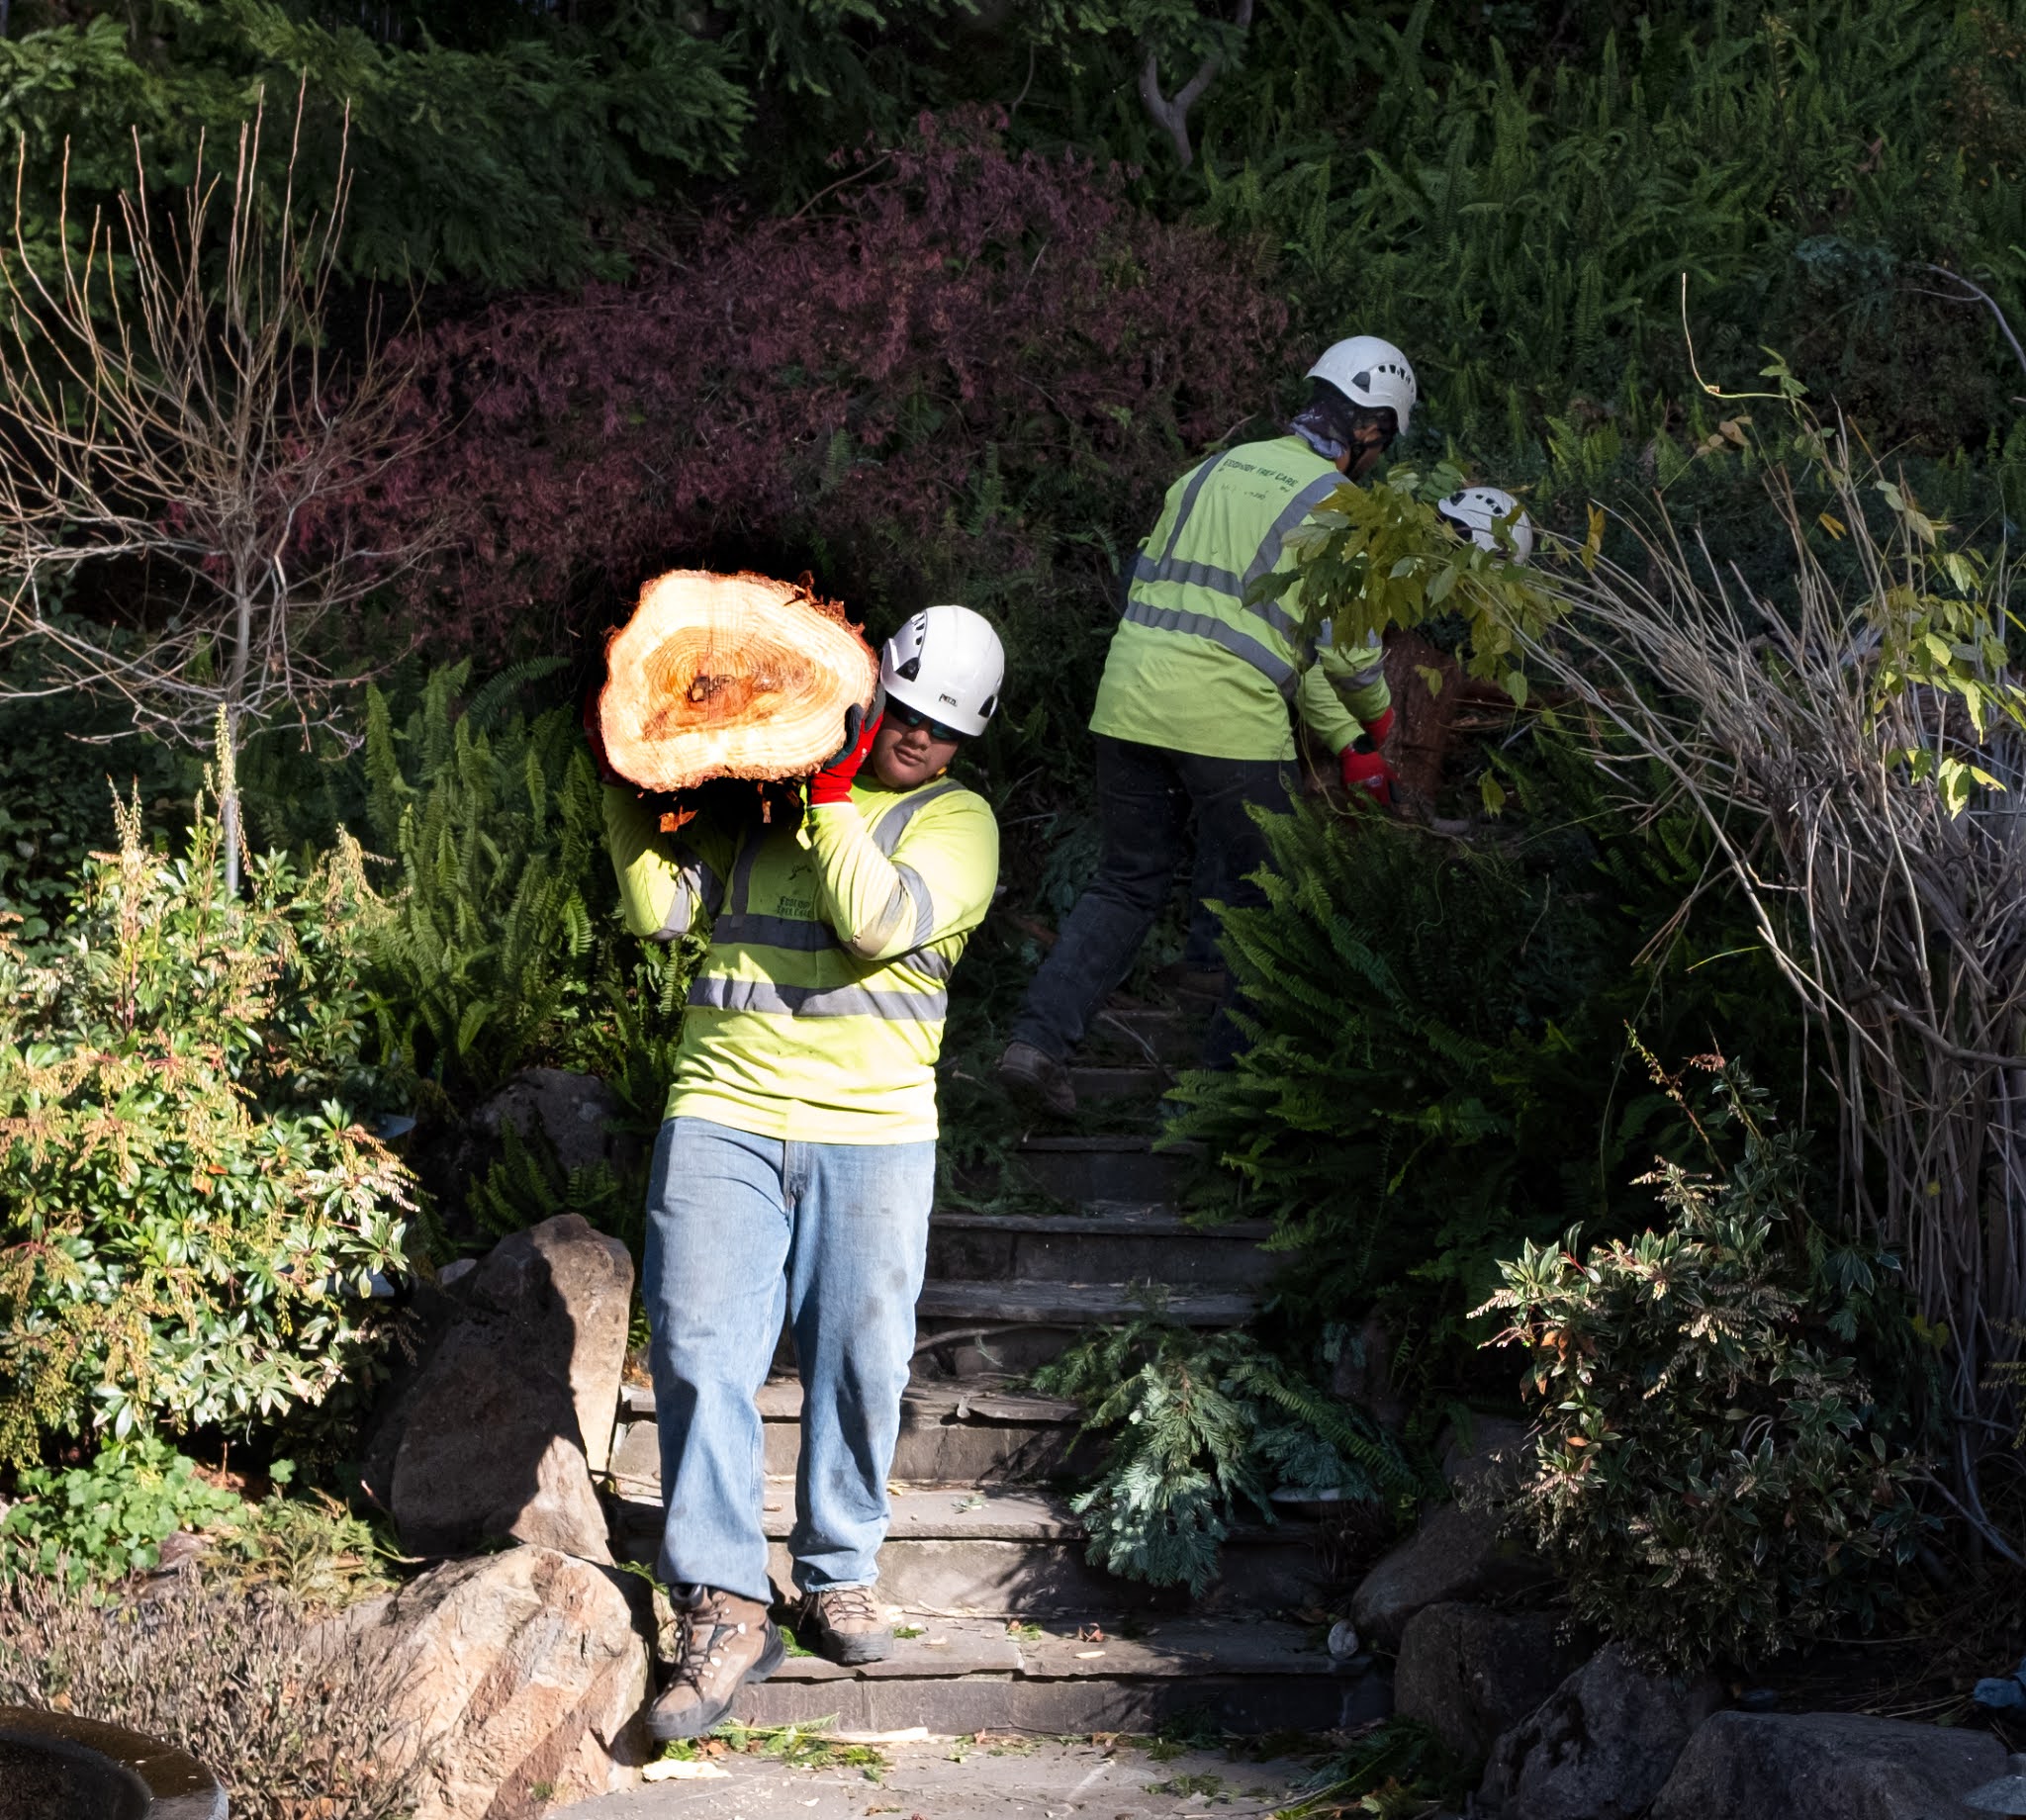
We called a tree service and they cut the fallen tree into sections, carrying out five-foot pieces to their shredding machine. Bill asked them to cut a slice of the trunk to keep. With the clean-up completed, we looked at the tree slice. Bill counted the rings -- 21 in all -- 21 years since the lightning strike which had separated the trunk into more fragile pieces. We both ran our hands over the rough, still moist piece, marveling at the growth between each ring, and touched where off-shoots had started to grow.


We have one unscathed redwood stump with three bears. The tree, which should have died after it was cut to the stump, flourishes and sends sprouts from the base and the crown of the tree, which we continue to prune down close to the stump. The tree, though, resists our efforts to contain it. It has begun to grow over and around the bears. In ten years, the bears will be gone.


There is always a lesson in trees, whether you go tree-bathing or have to cut a tree down. Redwoods, especially, remind me of their strength and their vulnerabilities. They do not have a tap root like other trees; instead, their shallow roots spread far around them comingling with other redwoods, which stabilizes them all in windstorms. Their thick bark and less tannin help them to survive fires, but they have no defense from lightning that can damage the trunks. They are usually the tallest in an urban forest and can be a lightning rod. The damage to the tree and to our yard reminds us that nothing lasts forever, that even the most sturdy can be cut down, but usually something new will grow in its place. 


Friday, December 18, 2020

HAPPY DANCE

Little things, more than usual, either bring me to tears or make me burst out laughing. A neighbor sent me a video of a svelt yogi twisting into amazing positions. The next scene showed an ordinary person attempting the same moves. I guffawed knowing which person was me. I keep reading short essays about first responders, COVID survivors, and the first people to receive the vaccinations. These snippets of life bring me to tears.


I also feel like doing a happy dance lately, a dance to let the vast feelings of relief after 9 months of uncertainty. All that suppressed anger over Trump and COVID-19, being in SIP, and just getting through 2020 is flaring out. But my happy dance is also over an insignificant thing in life. I have one moment of joy just for myself. My happy dance celebrates finally turning the corner in my attempts at watercolor painting. Like I said: a small thing compared to the rest of this year. 

I learned a lot from all my instructors who displayed their mastery and styles of watercolor in online classes. I've oohed and aahed and envied their lifelong practice, which developed their abilities far more than I ever will. As I continue to practice though, I am finding my style. I am working with the paints in a way I want to do after struggling with various techniques for the last few years.

This is a moment of gratitude to those instructors who shared their knowledge. I learned about hard and soft edges and painting neighboring shapes from Leslie Wilson. From Ted Nuttall, Michael Reardon, and Michael Holter, I learned about washes, blobs of color, shadows, and drips. From Carolyn Lord, Gary Bukovnik, and Sondra Holtzman, I learned about flat washes inside of shapes. From Brenda Swenson and Cindy Briggs how to organize a travel sketching journal. From Gloria Miller Allen and Julie Pollard, how to do negative painting.


So I'm doing a happy dance in tribute to these artists. I also know that the next time I pick up my paintbrush that I may be back to ground zero again. That's the way creativity wanders. But now I remind myself to slow down, let the paper dry, take a break, walk around the house and come back to add another layer, and not forget about the darks. I think about 2020 and realize that sheltering in place has given me the extra time to move forward in one small part of my life. I think about the instructors who have had to reinvent their classroom space on Zoom and who have suffered financially during this time. I think of those COVID stories that I hope will stay with me and guide me to action to do one small thing for someone else.

In this moment though, I am doing a happy dance.


Take a class or buy a painting. Help support artists.

http://www.lesliewilson.net

https://www.tednuttall.com

http://www.mreardon.com

https://www.michaelholter.com

https://www.carolynlord.com

https://garybukovnik.com

https://www.sondraholtzman.com

https://www.swensonsart.net

https://cindybriggs.com

http://www.mijelloart.com/gloria-miller-allen.html

https://www.juliegilbertpollard.com

Friday, December 11, 2020

SPREADING PEACE AND JOY


This holiday season is a good reminder to me to make the best of what we have and know that we will look back on this year and say, "Remember...."

This season is a good chance to receive a personal letter or postcard in the mail. I have creative friends who use a cutting machine such as Cricut to make beautiful designs.


I am always amazed to open an envelope to find one of their cards inside. Their designs are often intricate and always carefully done. I haven't purchased a Cricut yet. For now, I still make do with hand cut or hand punched designs when I make cards and decorations as part of this holiday season. I find I always need an extra card or two, so I am sharing some quick and easy cards to make. All of them feature a Christmas tree. They would be much easier to make using one of the cutting machines!


SUPPLIES NEEDED

Postcard-weight paper

Paper tape

Green Copy paper

Decorative paper (last year's wrapping paper or washi paper) cut into strips

Rice paper

Circle hole punches

Glue & Matte Medium with an old brush for spreading these

Embellishments such as stars

Watercolors & small round brush

Tombow dual brush pen or whatever marking pen you have on hand

Envelopes

TIPS FOR LETTERING

Practice lettering with the Tombow brush. I used the stiff end to practice letters, but you might like the brush instead. Good examples of lettering styles can be found at Pinterest and check YouTube for demos. Write slowly on your finished postcard when you are ready.


SIMPLE HOLE-PUNCH TREE


Punch out a dozen half-inch green circles. Arrange them in a tree shape on the postcard paper. Add a trunk cut from your decorative paper or washi. Add either smaller punched circles or embellishments to decorate the tree. Add hand lettering at the bottom of the card.


WATERCOLOR TREE


Using paper tape, create a triangle on the postcard paper. Make sure edges are pressed down or the watercolor will leak. I used a light and dark green wash over the triangle. While still damp, I dotted several places with gold paint. When the tree was completely dry, I removed the tape and placed red ornaments on the tree and a red triangle for the base. Because watercolor will warp the paper, be sure to press your postcards under a couple of books for a day.


WASHI TREE


I cut thin strips of washi paper (wrapping paper works well too). I coated a piece of rice paper with matte medium and placed the strips one after the other until I covered a six by seven inch segment. I coated the washi with matte medium and hung the paper to dry.


Washi strips glued to rice paper


I drew a six by seven inch rectangle on a piece of copy paper and divided it into four sections. I drew lines from each mark to make three tree-shaped triangles and two halves. I punched a hole in each of the points of the triangle so that I could mark the triangles on the washi paper. I used a cutting blade to cut out the triangles from the washi paper leaving my copy paper pattern intact. I trimmed the bottom of each triangle so that it would fit on the postcard. I had lots of trimmings left over. I glued the tree-shaped triangles to each postcards and added a star on top.


Pattern for triangle trees


With the washi paper that I trimmed from the original triangles, I made two more cards using the strips that I shaped on the copy paper pattern. I glued the strips to the postcard paper.


Use pattern to cut strips to fit inside tree shape

On all the trees, I added hand-lettered words. These trees are a quick way to add some personal touches to your holiday. I use them as gift tags, thank you cards, and ornaments. Have fun!


Be sure to use an envelope to mail any of these cards. 


Check out the YouTube tutorial for hand lettering: 

HowTo: Calligraphy & Hand Lettering for Beginners  https://youtu.be/sBoVGqiSzr4

Pinterest is a great source for examples of fonts: https://www.pinterest.com/search/pins/?q=contemporary%20hand%20lettering&rs=typed&term_meta[]=contemporary%7Ctyped&term_meta[]=hand%7Ctyped&term_meta[]=lettering%7Ctyped 


Friday, December 4, 2020

BLAST FROM THE PAST


We tackled the garage recently. Another attempt to clear pathways through our stuff. I laughed when I discovered a box tucked away on a shelf above my head. The cardboard container had dividers inside to hold six bottles of wine. It had been empty and hiding for years. Bill said, "That's the first case of wine we ever ordered." I looked at him with crossed eyes. There was no wine inside the box, but we still saved the box -- a memento of another time.

We are still cleaning. When you are accumulators and/or artists, you save everything. Underneath a pile of old sketchbooks, I found a gold box filled with a project I had sent to Mademoiselle magazine when I was enticing them to choose me as a Guest Editor for their annual College issue. I won a seat at the magazine, but I had forgotten that I saved one of my many submissions: a 3-D construction of a shopping mall that I called Pooka Park. I laughed at the pieces in my hands as the construction fell apart, the glue and tape long ago had turned yellow and lost its tackiness. Yet, looking at the pieces, I realized I had a treasure of late 60s styles. I re-sorted the pieces laying them on a larger paper and took pictures this time. Did I then throw the project away? What do you think?


Pooka Park by Martha Slavin


The original ad by Mademoiselle magazine.
Does the style remind you of psychedelic posters from the Fillmore in San Francisco?


We had many adventures during our month in New York City including a night out at the Tavern on the Green in Central Park. Helen Hayes attended the event along with other celebrities. We Guest Editors wore shiny paper dresses.